안녕하세요. 오랜만에 아두이노 관련 포스트를 올리네요. 오늘은 작년에 만들었던 사장님 놀리기 프로젝트인 Mission JS에서 사용했던 무선 모듈과 아두이노 관련 자료를 공유드리려 합니다. 아직 Mission JS를 못보셨다구요? 그럼 일단 동영상 부터 보시죠.
동영상을 보시면 뭔가 복잡하고 이런 저런 부품들이 많이 쓰인 것 같아보이지만 사실 파고 들어보면 별거 아니랍니다. 나름 회사 홍보 영상이라 좀 있어보이게 만들었거든요 ㅋㅋㅋ 아두이노 2개를 이용하여 센서 모듈 하나와 모터 모듈 하나를 만들고, 저렴한 가격의 2.4GHz 무선 통신 모듈인 nRF24L01를 이용해 센서의 동작 여부를 모터쪽으로 보내줍니다. 사용한 센서는 단순히 기울기에 따라 On/Off 되는 Tilt Switch 입니다.
Mission JS 준비물
2 x Arduino Uno
2 x nRF24L01 Wireless module
1 x Servo Motor
1 x Tilt Switch
1 x USB Missile
1 x PC
하드웨어 연결
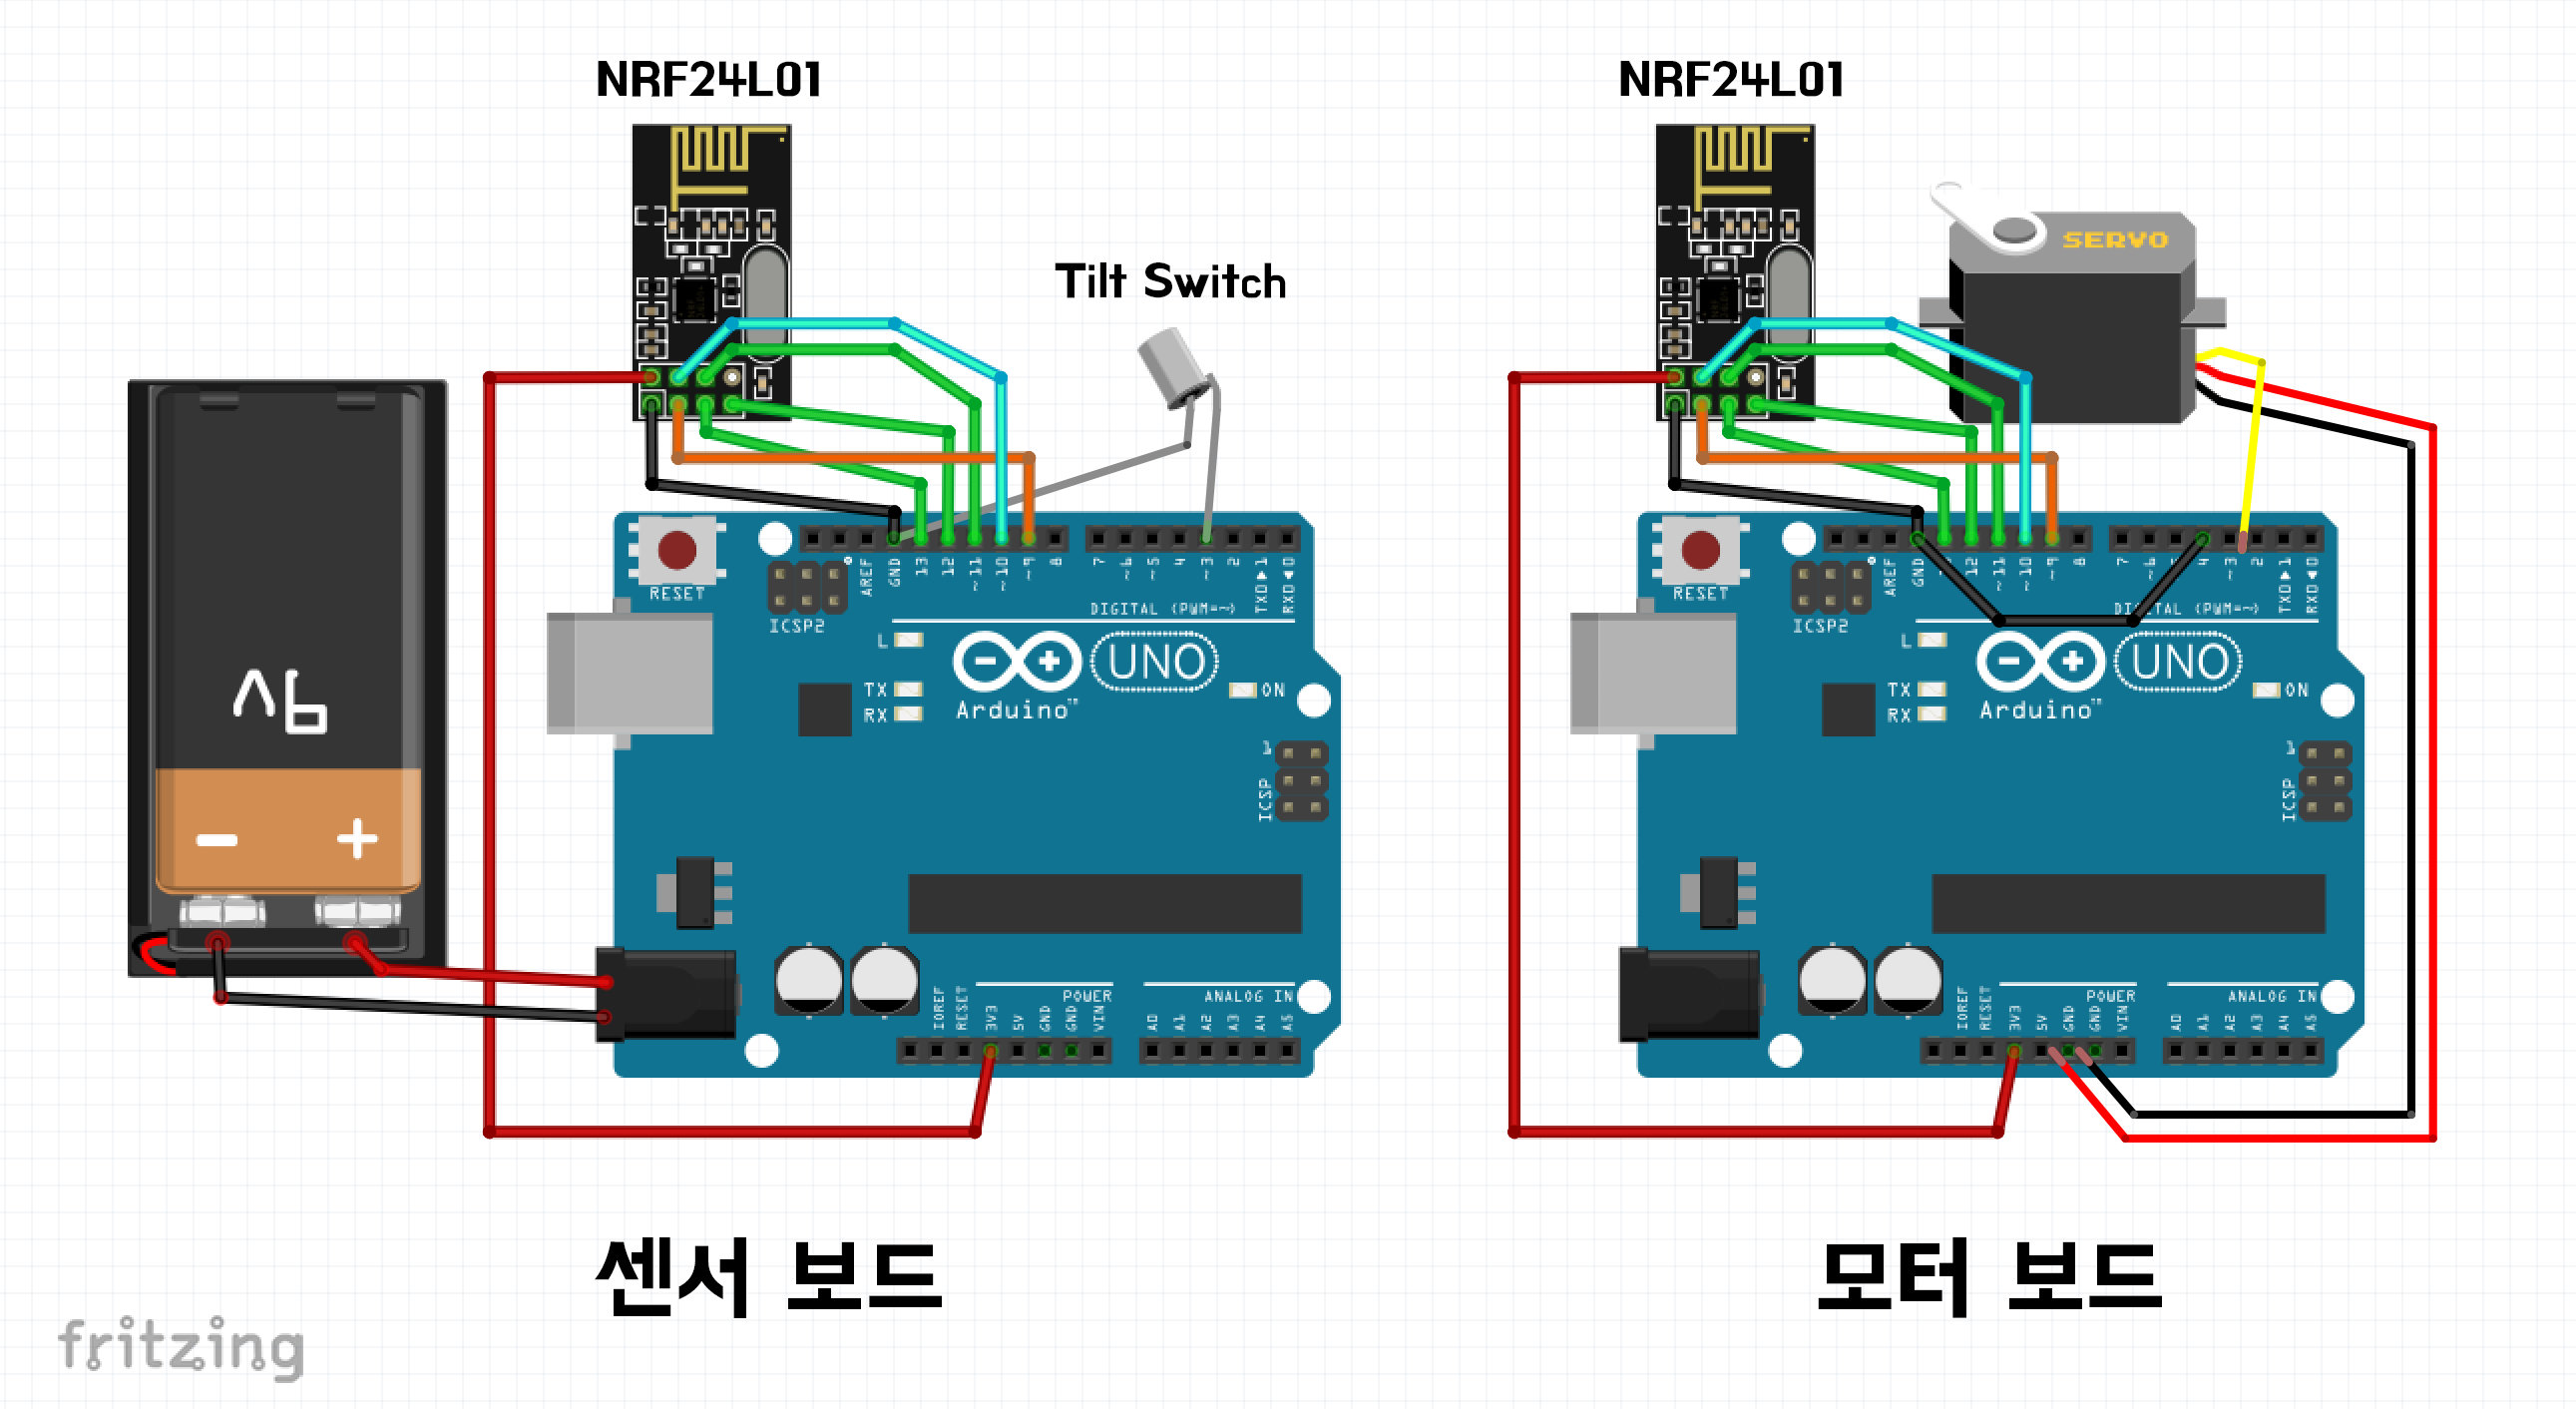 센서보드는 의자 뒤쪽에 부착하여 의자가 기울어지면 신호를 보내도록 만들어졌기 때문에 배터리를 붙여주었습니다. 스위치 각도를 조정하기 쉽도록 전 별도의 브레드보드에다 올려주었어요. 스위치에 0 -> 1 또는 1 -> 0 으로 상태 변경이 생기면 무선 통신 모듈이 모터 보드 쪽으로 신호를 보내고, 서보 모터는 변경이 생길 때 마다 70도 -> 0도로 이동하여 노트북의 스페이스바를 누르도록 하였습니다. USB 미사일도 사실 라즈베리파이 등을 사용하면 python 스크립트로 조정을 할 수 있긴 한데 너무 일이 복잡해지기 때문에 단순하게 스페이스바만 누르는 방식으로 만들었구요 ^^; 그리고 모터 보드의 4번 핀이 그라운드에 묶여있는 이유는 4번 핀의 상태에 따라 센서 보드와 모터 보드를 구분하기 때문입니다. (센서 보드에는 Pull Up 됨)
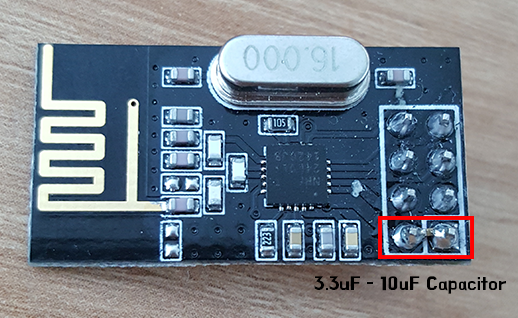
그리고 Arduino Uno를 사용할 경우 우노의 3.3V 전류가 50mA밖에 되지 않기 때문에 모듈의 Vcc와 그라운드 사이에 아래와 같이 Capacitor를 하나 붙여주면 좀 더 안정적인 동작을 기대할 수 있습니다.
아두이노 코딩
아두이노는 2개가 쓰이지만 코드는 한가지로 통일을 했습니다. 위에서 설명한 4번 핀의 상태에 따라 보드의 동작이 바뀌게 되구요. 아래 코드의 동작을 위해서는 Maniacbug의 RF24 라이브러리(링크)를 받아줘야 합니다. 그리고 제 코드는 이 링크에서 받아주세요.
/*
 Copyright (C) 2011 J. Coliz <maniacbug@ymail.com>

 This program is free software; you can redistribute it and/or
 modify it under the terms of the GNU General Public License
 version 2 as published by the Free Software Foundation.
 */

#include <SPI.h>
#include "nRF24L01.h"
#include "RF24.h"
#include "printf.h"
#include <Servo.h>

// Set up nRF24L01 radio on SPI bus plus pins 9 (CE) & 10 (CSN)
// NRF24L01 모듈 하드웨어 연결
RF24 radio(9,10);

// Set up Servo motor
Servo myservo;

// sets the role of this unit in hardware. Connect to GND to be the 'Motor' board receiver. Leave open to be the 'remote' transmitter
// 보드 역할 설정. 모터 보드의 role_pin을 그라운드로 연결
const int role_pin = 4;

// Pins on the remote for buttons. 버튼으로 사용할 핀 array
const uint8_t button_pins[] = { 3 };
const uint8_t num_button_pins = sizeof(button_pins);

// Pins on the motor board for motors. 모터 제어에 사용할 핀 array
const uint8_t motor_pins[] = { 3 };
const uint8_t num_motor_pins = sizeof(motor_pins);

// Topology
// Single radio pipe address for the 2 nodes to communicate. 싱글 라디오 파이프라인.
const uint64_t pipe = 0xE8E8F0F0E1LL;

// Role management
// Set up role.  This sketch uses the same software for all the nodes in this system.  Doing so greatly simplifies testing.  The hardware itself specifies which node it is. This is done through the role_pin.
// 역할 pin관련 설정.

// The various roles supported by this sketch
typedef enum { role_remote = 1, role_motor } role_e;

// The debug-friendly names of those roles. 시리얼 모니터에서 보여줄 이름 설정
const char* role_friendly_name[] = { "invalid", "Remote", "Motor Board"};

// The role of the current running sketch
role_e role;

// Payload
uint8_t button_states[num_button_pins];
uint8_t motor_states[num_motor_pins];


// Setup
void setup(void)
{

  // set up the role pin. 역할 핀 설정
  pinMode(role_pin, INPUT);
  digitalWrite(role_pin,HIGH);
  delay(50); // Just to get a solid reading on the role pin

  // read the address pin, establish our role
  if ( digitalRead(role_pin) )
    role = role_remote;
  else
    role = role_motor;

  // Attach servo on pin 3. 서보모터 초기화
  myservo.attach(3);

  // Print preamble. 시리얼 모니터 시작
  Serial.begin(57600);
  printf_begin();
  printf("nrRF24/examples/motor_remote/nr");
  printf("ROLE: %snr",role_friendly_name[role]);

  // Setup and configure rf radio. 무선 통신 시작
  radio.begin();

  // Open pipes to other nodes for communication. 파이프라인 열기
  if ( role == role_remote )
  {
    radio.openWritingPipe(pipe);
  }
  else
  {
    radio.openReadingPipe(1,pipe);
  }

  // Start listening. 모터 보드 listening 시작
  if ( role == role_motor )
    radio.startListening();

  // Dump the configuration of the rf unit for debugging
  radio.printDetails();

  // Set up buttons / motors
  // Set pull-up resistors for all buttons. tilt switch 핀에 대한 풀업 설정
  if ( role == role_remote )
  {
    int i = num_button_pins;
    while(i--)
    {
      pinMode(button_pins[i],INPUT);
      digitalWrite(button_pins[i],HIGH);
    }
  }

  // Default position of Servo is at 70 degree. 서보 모터 최초 위치 지정
  if ( role == role_motor )
  {
    int i = num_motor_pins;
    while(i--)
    {
      myservo.write(70);
    }
  }

}

// Loop
void loop(void)
{
  // Remote role.  If the state of any button has changed, send the whole state of all buttons.
  // 센서 보드에 대한 동작 정의
  if ( role == role_remote )
  {
    // Get the current state of buttons, and test if the current state is different from the last state we sent.
    // 스위치의 상태가 변경되면 변경 사항을 모터보드로 전송
    int i = num_button_pins;
    bool different = false;
    while(i--)
    {
      uint8_t state = ! digitalRead(button_pins[i]);
      if ( state != button_states[i] )
      {
        different = true;
        button_states[i] = state;
      }
    }

    // Send the state of the buttons to the motor board
    if ( different )
    {
      printf("Now sending...");
      radio.write( button_states, num_button_pins );
      bool ok = radio.write( button_states, num_button_pins );
      if (ok)
        printf("oknr");
      else
        printf("failednr");
    }

    // Try again in a short while
    delay(20);
  }

  // Motor role.  Receive the state of all buttons, and reflect that in the Motors
  // 모터 보드 동작 정의
  if ( role == role_motor )
  {
    // if there is data ready
    if ( radio.available() )
    {
      // Dump the payloads until we've gotten everything
      bool done = false;
      while (!done)
      {
        // Fetch the payload, and see if this was the last one.
        done = radio.read( button_states, num_button_pins );

        // Spew it
        printf("Got buttonsnr");

        // For each button, if the button now on, then toggle the motor
        // 스위치 상태가 변경되면 모터 위치 변경
        int i = num_motor_pins;
        while(i--)
        {
          if ( button_states[i] )
          {
            motor_states[i] ^= HIGH;
            //digitalWrite(motor_pins[i],motor_states[i]);
            myservo.write(0);
            delay(300);
            myservo.write(70);
            delay(300);
          }
        }

      }
    }
  }
}
그럼 다음에 더 재미있는 아두이노 프로젝트로 찾아뵙겠습니다 🙂